The Hidden Frustration of Traditional Backyard Gardening
Look at your hands right now. If you have ever tried starting a backyard garden, you probably know the exact feeling of scrubbing thick mud out from under your fingernails while your lower back screams in pain. For a long time, I honestly thought fighting with rock-hard clay and pulling endless weeds was just the normal price we had to pay to eat a homegrown tomato. But what if I told you that the dirt itself is actually the main thing killing your plants—and your motivation? You do not need a "green thumb" to fix this; you just need to ditch the dirt completely.
Imagine this familiar scenario. You wake up on a beautiful Saturday morning, feeling highly motivated to finally start that backyard vegetable garden. You buy the seeds, grab a shovel, and head outside.
Within an hour, your back is aching. Your hands are covered in thick, muddy clay. You spend the entire weekend pulling stubborn weeds out of the ground, only to realize the soil in your yard is rock hard.
A few weeks pass, and you notice your tiny tomato plants are struggling. Pests are chewing holes in the leaves, and the dirt seems to dry out almost instantly under the sun. You water them every day, but nothing seems to work.
The mess constantly tracks into your house. You find mud on your shoes, dirt under your fingernails, and dirt on your kitchen floor. The joy of growing your own food quickly turns into a stressful chore.
Many people simply give up. They look at their empty backyard and think they just do not have a "green thumb." But the truth is, the problem is not you. The problem is the unpredictability of the dirt beneath your feet.
What if you could bypass the dirt entirely? What if you could grow crisp lettuce, juicy tomatoes, and fresh herbs without ever touching a shovel or pulling a single weed?
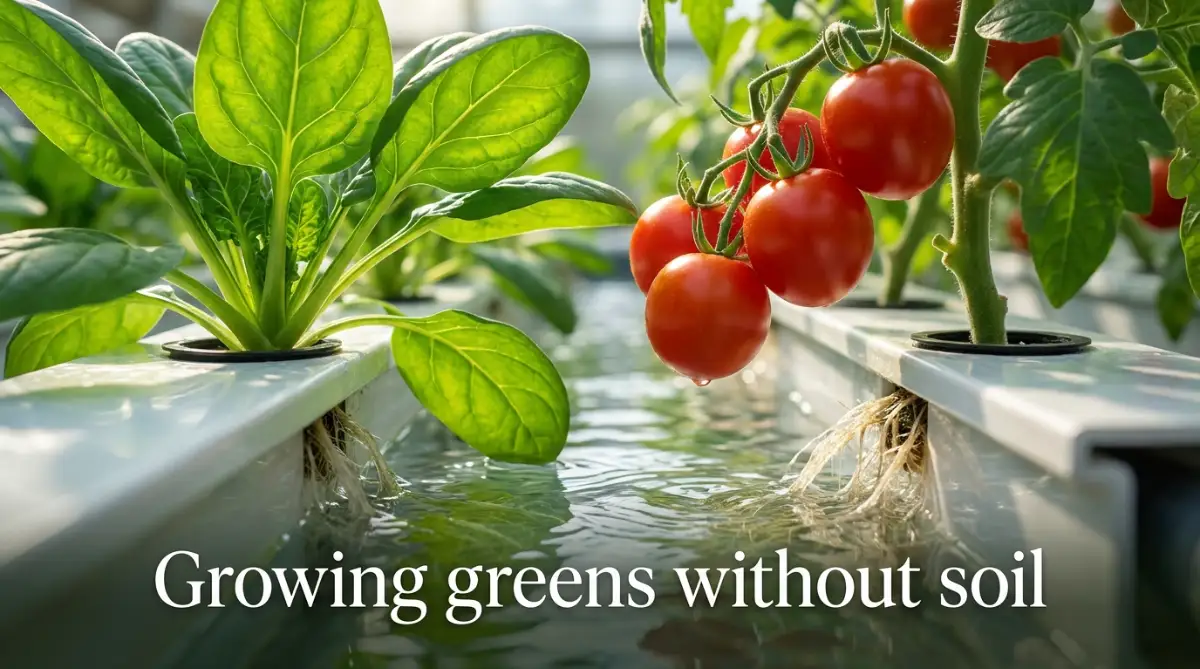
Growing vegetables without soil is not a futuristic dream. It is a very real, highly practical method that regular people are using right now to reclaim their backyards and grow massive amounts of healthy food with zero mess.
What You Will Learn In This Guide (Key Takeaways):
- Why traditional soil actually slows down plant growth and invites pests.
- How the "Kratky Method" lets you grow fresh food in a 5-gallon bucket using zero electricity.
- The exact cheap materials you need to anchor your plants without using mud.
- Simple daily habits to prevent root rot, algae, and nutrient lockout so your plants never die.
Breaking Free from Dirt: The Mechanics of a Clean Garden
To understand how to grow food without dirt, we first need to understand what dirt actually does. Many beginners think soil is magical. We assume plants eat the dirt to grow tall and strong.
But science tells us a completely different story. Plants do not care about dirt at all.
Soil is essentially just a sponge. It holds water, provides oxygen to the roots, and stores natural minerals. It also acts as an anchor to keep the plant standing upright.
That is it. If you can provide water, oxygen, minerals, and physical support, a plant will thrive beautifully without ever seeing a single grain of sand or clay.
Think of traditional gardening like sending a plant on a wild treasure hunt. The plant has to spend a massive amount of energy growing huge root systems just to search through heavy soil for tiny drops of water and food.
Now, imagine a soil-free system. This is like a fine-dining restaurant delivering meals directly to the plant's table.
Because the roots get exactly what they need instantly, the plant uses all its energy to grow bigger leaves and juicier fruits instead of searching for food.
Traditional Dirt vs. Soilless Setup: A Quick Reality Check
Let us look at a simple comparison so you can see exactly why bypassing dirt is so effective for home growers.
Feature Traditional Dirt Garden Soil-Free Garden Setup
Weeding Requires weekly physical labor Zero weeds, ever
Growth Speed Normal, dependent on weather Up to 30% faster growth
Water Usage High (water evaporates quickly) Uses 90% less water
Pest Control High risk of soil-borne bugs Extremely low risk
Space Needed Requires a large plot of land Can fit on a small patio
As you can see, dropping the dirt instantly removes the hardest parts of growing food. You save your back, you save your weekends, and you save a massive amount of water.
Now that we know why this works, let us look at exactly how you can build this exact setup in your own backyard this week.
Selecting Your First "Non-Dirt" Growing Medium
If we are not using soil to hold our plants up, what do we use? We use clean, sterile materials called "growing mediums."
These materials do an amazing job of holding the plant up while allowing water and oxygen to flow freely around the roots. You can find these easily at any local garden center or online shop.
Option 1: Coco Coir
This looks exactly like rich, dark soil, but it is actually made from the fuzzy brown outside of a coconut. It is incredibly lightweight, smells completely clean, and holds water perfectly.
When you touch coco coir, it feels soft and fluffy. It is an amazing choice for growing carrots or radishes because the roots can push through it with zero resistance.
Option 2: Clay Pebbles
These look like tiny, baked clay marbles. They are very hard, completely reusable, and provide massive amounts of oxygen to the roots.
Clay pebbles are perfect for heavier plants like tomatoes or cucumbers. Because they are heavy, they stop the plant from falling over when it gets tall. Plus, they make a very satisfying clicking sound when you pour them!
Option 3: Rockwool Cubes
Imagine a sponge made out of melted rocks. That is rockwool. It sounds strange, but it is one of the most popular tools for starting seeds.
You simply drop a single lettuce seed into a tiny hole in the wet rockwool cube. Within a few days, a perfect little green sprout will pop out, completely free of any muddy mess.
The "Set It and Forget It" Kratky Strategy
Now that we have our clean anchors, we need a way to feed the plants. The easiest way to start a soil-free backyard garden is through a brilliant method known as the Kratky approach.
This method requires no electricity, no water pumps, and no complicated machinery. It relies entirely on basic physics.
Here is exactly how this setup works in real life.
First, you take a clean container. A regular five-gallon plastic bucket with a tight lid is the perfect starting point.
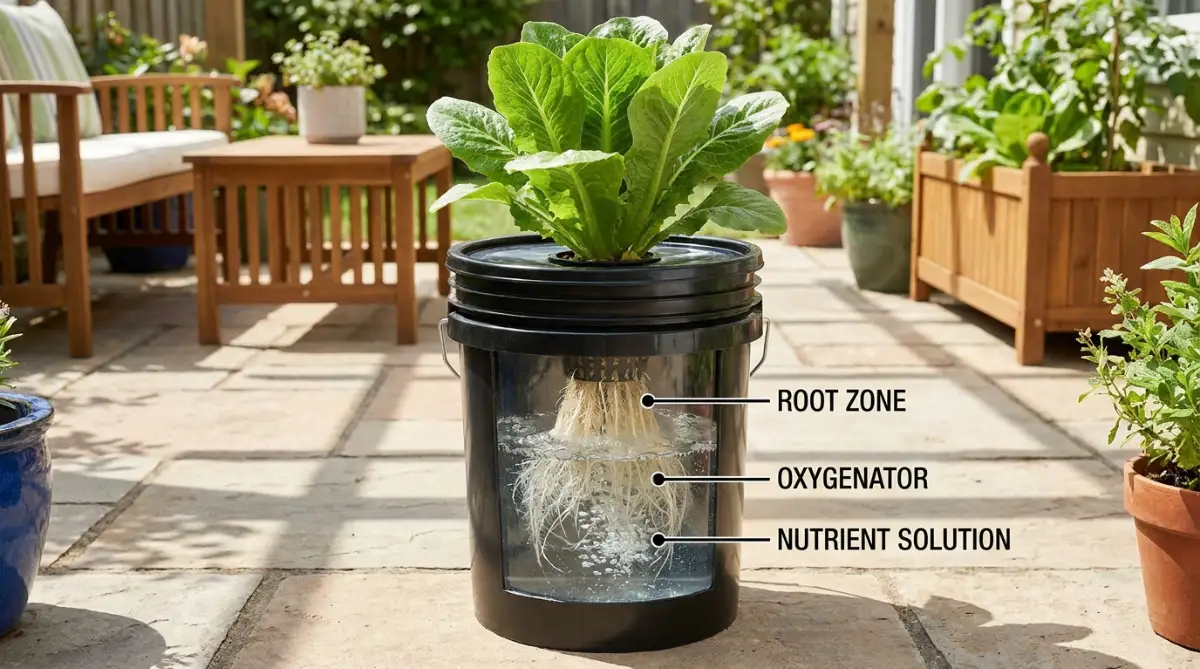
You need to block out the sun. Light hitting your water will cause thick green algae to grow, which steals oxygen from your plants. If your bucket is white or clear, wrap it tightly in black trash bags or paint the outside black.
Next, you cut a small circular hole in the lid of the bucket. You place a small plastic basket—often called a net pot—into that hole.
You fill that little plastic basket with your chosen clean medium, like those clay pebbles we talked about earlier. Then, you place your small vegetable seedling right into the pebbles.
Now, you fill the large bucket with clean water until it just barely touches the bottom of the plastic basket.
As the plant grows, it will push long, white roots down through the basket directly into the water pool below.
Here is the magic of this specific strategy. As the plant drinks the water over several weeks, the water level inside the bucket slowly drops.
This dropping water level naturally exposes the top half of the plant's roots to the open air inside the bucket.
Those air-exposed roots will breathe oxygen, while the bottom roots continue to drink the water. The plant gets a perfect balance of air and food with absolutely zero effort from you.
Hydroponics Myth vs. Fact Check
Before I built my first setup, my head was full of doubts. Let us clear up a few common worries you might have right now:
- Myth: "Standing water breeds thousands of mosquitoes."
- Fact: Mosquitoes only lay eggs in open water. Because our bucket has a tight lid and a plant blocking the hole, bugs physically cannot get inside.
- Myth: "The food will taste watery and fake."
- Fact: Soil-free veggies actually taste sweeter and crisper because the plant never experiences a single day of drought or nutrient stress.
Mastering the Simple Chemistry of Plant Food
Since we are using plain water instead of rich soil, we have to add the minerals ourselves. This sounds like complicated chemistry, but it is actually as simple as making a cup of instant coffee.
You will need a basic liquid nutrient solution. These are easily available online and usually come in two or three separate bottles.
These bottles contain everything a plant naturally searches for in the dirt: nitrogen for green leaves, phosphorus for strong roots, and potassium for big, juicy fruits.
The Golden Rule of Mixing: Always read the instructions on the bottle closely. You will usually add just a few teaspoons of this liquid to your five-gallon bucket of water and stir it well.
Once your water is mixed with the food, there is one final check you need to do before giving it to your plants. You need to check the pH level.
If you want to see exactly how this soil-free setup looks in real life, watch this quick and easy video below. It shows you step-by-step how to build your first simple hydroponic garden at home, making the whole process incredibly easy to follow!
Why does pH matter so much?
Imagine trying to eat a delicious dinner while your jaw is wired shut. The food is right in front of you, but you cannot consume it.
That is exactly what happens to a plant if the water's pH is wrong. If the water is too acidic or too alkaline, the plant's roots physically lock up. They will starve to death even while floating in a pool of perfect nutrients.
Vegetables generally prefer a slightly acidic environment. You want to aim for a pH number right around 6.0.
You can measure this easily with cheap pH testing drops. You scoop a little water into a tiny tube, add three drops of the testing liquid, and watch the water change color.
If it turns bright orange or yellow, you are in the perfect safety zone. If it turns dark blue or green, the water is too alkaline, and you just add a drop of "pH Down" liquid to fix it.
My Personal pH Cheat Sheet for Everyday Veggies
I keep a sticky note with these exact numbers right on my fridge. It takes away all the guesswork when I mix my water:
- Lettuce & Spinach: Keep it right at 5.5 to 6.0
- Tomatoes: They like it slightly higher, around 6.0 to 6.5
- Basil & Herbs: Aim for 5.8 to 6.2
- If you simply keep your water hovering near the 6.0 mark, almost any backyard vegetable will grow perfectly fine.
Real-Life Scenario: The Balcony Lettuce Farm
Let us put all this information into a practical, real-life scenario so you can visualize your success.
Suppose you live in an apartment and only have a small, sunny concrete balcony. You have no grass, no dirt, and very little space.
You can set up three black plastic buckets in a row against the wall. You fill them with water, add a few drops of nutrients, and balance the pH.
You place a small net pot with clay pebbles into the lid of each bucket. In the first bucket, you plant romaine lettuce. In the second, fresh spinach. In the third, fragrant basil.
Because lettuce grows incredibly fast in a soil-free setup, within 30 days, you will have massive heads of clean, crisp greens.
You will not have to wash mud off your lettuce. You will not find little black bugs hiding in the leaves.
You simply walk out onto your balcony with a pair of clean scissors, snip off what you need for a fresh dinner salad, and walk back inside. The plants will continue to grow new leaves directly from the clean water below.
This simple daily routine completely removes the heavy burden of traditional outdoor chores. You gain the ultimate reward of fresh, homegrown food while maintaining complete peace of mind.
Elevating Your Soil-Free Garden: Strategies for Long-Term Success
Getting your first soil-free bucket set up is an amazing feeling. But keeping those plants thriving month after month requires a slight shift in how you look at gardening.
Because we are completely controlling the environment, we have the power to push these vegetables to produce far more food than they ever could outside in the dirt. It is all about managing the little details.
Let us look at how you can upgrade your simple setup into a highly productive food factory without adding hours of extra work to your week.
Managing The "Hidden Half" of Your Plants
When we look at a garden, we usually only see the green leaves and the bright red tomatoes. We focus almost entirely on the top half of the plant.
But in a soil-free system, the real magic happens entirely underwater. The root system is the engine that drives your entire garden. If the roots are happy, the top of the plant will practically grow itself.
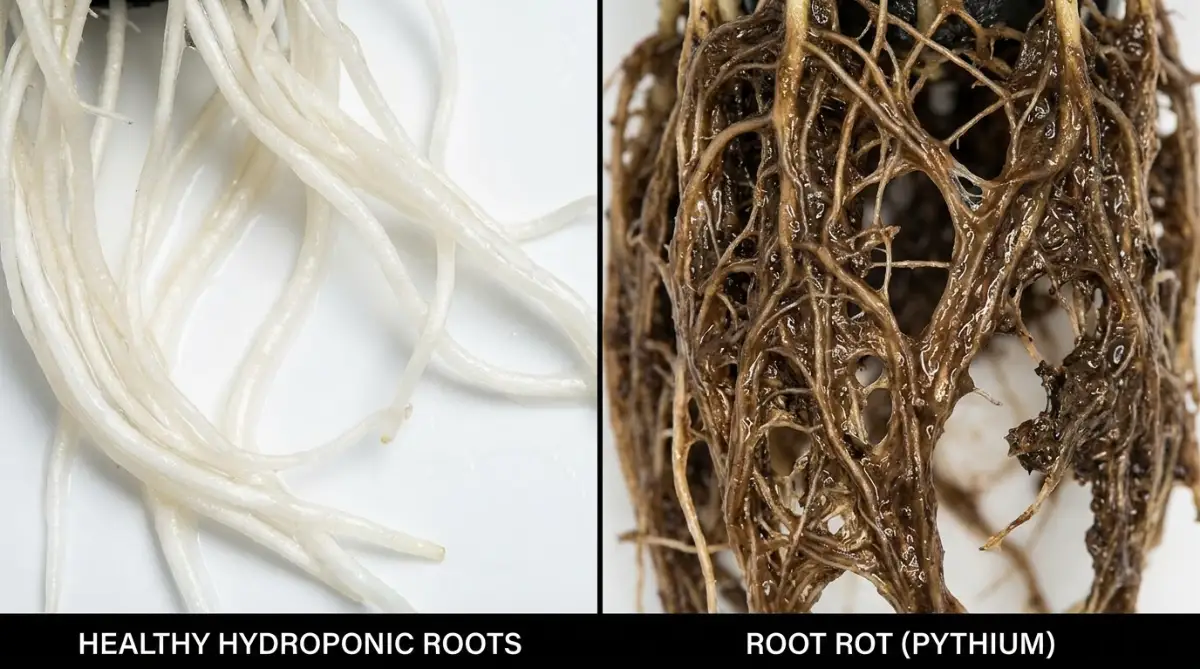
Healthy roots in this kind of system should look like wet, white spaghetti. They should be firm to the touch and smell completely clean, much like fresh rain.
If you notice the roots turning a dark brown color, or if they start to feel slimy and smell bad, you have a problem called root rot. This happens when the water gets too warm and holds less oxygen.
Pro Tip: Keep your water buckets completely shaded. Sun shining directly onto the sides of your black buckets will heat the water inside like an oven, cooking your fragile roots.
If you are growing on a hot, sunny patio, try wrapping the outside of your black buckets in shiny aluminum foil or painting them bright white. This reflects the intense heat away while keeping the inside perfectly dark for the roots.
Understanding Nutrient Lockout
Sometimes you will mix your plant food perfectly, balance the pH, and provide plenty of sunlight, but your plants will still look pale and sick.
The edges of the leaves might turn brown, or the new growth might twist into strange, curly shapes. This frustrating scenario is often caused by something called nutrient lockout.
As the plant drinks water, it does not always drink the minerals at the exact same speed. Over a few weeks, certain minerals begin to build up inside the bucket, throwing the whole chemical balance off.
The plant suddenly refuses to eat anything at all, even though the food is right there in the water.
The fix for this is incredibly simple, but many beginners skip it. You must completely dump out and replace your water every three to four weeks.
Think of it like taking a bath. You would not want to sit in the same dirty bathwater for a month. Your plants feel exactly the same way.
Emptying the bucket, rinsing it out with clean water, and mixing a completely fresh batch of nutrients will instantly refresh your plants and prevent nutrient lockout from ever happening.
The Art of Selective Pruning
When growing without soil, plants often grow so fast they become a tangled mess. They produce dozens of thick leaves that block out the sun from the inner branches.
Many people are scared to cut healthy leaves off their plants. They think they are hurting it.
But in reality, strategic pruning is one of the best things you can do for a fruiting vegetable. By snipping off the bottom-most leaves that are sitting in the shade, you force the plant to redirect its energy.
Instead of feeding those useless lower leaves, the plant pushes all that water and nutrition straight up to the top where the fruits are trying to form.
This simple weekly habit of removing a few hidden leaves will result in significantly larger tomatoes, crisper lettuce heads, and much stronger stems. You can even read deeply into the science behind how pruning affects plant hormone distribution through local agricultural extensions.
The Hidden Traps That Destroy First-Time Setups
Transitioning away from dirt is an exciting journey, but it is not entirely foolproof. The sheer speed at which these plants grow means that small mistakes can escalate into major disasters almost overnight.
If a dirt garden gets too dry, the plant might droop for a few days before bouncing back after a rainstorm.
If a soil-free garden runs completely out of water, the delicate roots dry out in the open air, and the plant can die entirely in just a few hours. Let us explore the most painful traps beginners fall into, so you can easily sidestep them.
The Deadly Mistake of "Topping Off"
This is arguably the single most common error new growers make when using the Kratky bucket method.
Remember how we discussed the water level slowly dropping over several weeks? This drop naturally exposes the top half of the roots to the air, allowing them to breathe essential oxygen.
Many well-meaning beginners walk out to their patio, lift the lid, and panic when they see the bucket is only half full. Their immediate instinct is to grab a hose and fill the bucket all the way back up to the top.
This is a fatal mistake.
By filling the bucket back to the very top, you are instantly drowning those specialized "air roots." The plant can no longer breathe oxygen, and it will quickly suffocate under the water.
My biggest mistake during my first month was ignoring this exact rule because I thought my thirsty pepper plant needed a completely full bucket of water to survive. I filled the water all the way up and accidentally suffocated the roots, killing the plant within just a few days. Trust me, learning to leave that empty air gap alone was the biggest game-changer for my home garden!
If you must add water because the bucket is completely bone dry, only fill it up halfway. Never let the water level touch the bottom of the plastic net basket again once the plant is fully grown.
Always respect the air space. It is just as important as the water itself. It requires a mindset shift similar to learning how to manage new responsibilities, much like understanding why your first solo trip changes everything and alters your entire perspective on independence.
Ignoring the Warning Signs of Algae
Algae is the silent killer of a soil-free garden. It is a tiny, single-celled green organism that thrives in warm, sunny water.
Many beginners try to save money by using cheap, semi-clear plastic tubs instead of solid black buckets. They think it will not matter that a little bit of light shines through the plastic.
Within a week, the water will turn thick, green, and start to smell like a swamp.
Algae is incredibly greedy. It will aggressively consume all the expensive nutrients you bought for your vegetables. Worse, it will suck all the oxygen directly out of the water, leaving your plant roots to suffocate.
Once algae takes over a system, it is extremely difficult to remove without throwing everything away and starting over.
You must be absolutely militant about light leaks. Make sure your lids fit tightly. Make sure there are no open holes where sunlight can penetrate the dark water reservoir below.
Overfeeding: The "More is Better" Trap
When we see a sick plant, our natural human instinct is to give it more food. We assume it is hungry.
In the world of soil-free growing, dumping extra nutrients into the water without measuring is incredibly dangerous. Liquid fertilizers are highly concentrated salts.
If you put too much salt into the water, it physically burns the delicate root system. The edges of your lettuce leaves will turn brown and crispy, as if someone held a lighter to them.
Always err on the side of caution. If the bottle says to use one teaspoon per gallon, use exactly one teaspoon. Never eyeball the measurements.
It is always better to slightly underfeed your plants than to accidentally burn their roots off with a heavy dose of liquid fertilizer.
Bringing Your Clean Garden Vision to Life
Walking away from traditional dirt gardening is a surprisingly emotional shift. We are letting go of decades of ingrained habits about how food is supposed to be grown.
But once you experience the sheer joy of pulling a massive, perfectly clean head of lettuce directly from a bucket of clear water, you will never want to touch a muddy shovel again.
You are stepping into a cleaner, significantly faster, and far less physically demanding way of providing for your household. You are no longer fighting against the weeds, the hard clay, or the unpredictable soil pests.
Instead, you are providing your plants with exactly what they need, exactly when they need it. The result is an abundance of crisp, delicious, and incredibly healthy food right on your own patio or backyard space.
Start small this weekend. Grab a single black bucket, a small net pot, and a tiny lettuce seedling. Mix your first batch of nutrient water and simply watch what happens over the next thirty days.
The hardest step is simply convincing yourself that growing beautiful food does not have to be a painful, dirty struggle. The green leaves, clean hands, and lack of back pain will quickly prove just how rewarding this simple system truly is.
Disclaimer: The gardening strategies and physical setups discussed in this guide are for informational and educational purposes only. Results may vary depending on local weather conditions, specific plant varieties, and individual environmental setups. Always read the safety instructions on any liquid fertilizers and securely store gardening materials away from small children and household pets.